Super Router older version
As a merchant, are you using or planning to use multiple payment aggregators (PA)? Do you want to improve your payment success rates? Are you worried that your technical team will have to spend efforts to integrate multiple payment aggregators instead of developing actual business requirements?
Paytm’s Super Router helps you route payment transactional traffic between multiple payment aggregators using our proven routing engine that helps you achieve high payment success rates. All this can be achieved with only one developer-friendly integration providing you quicker time to market and let us handle the integrations with multiple payment providers.
Overview
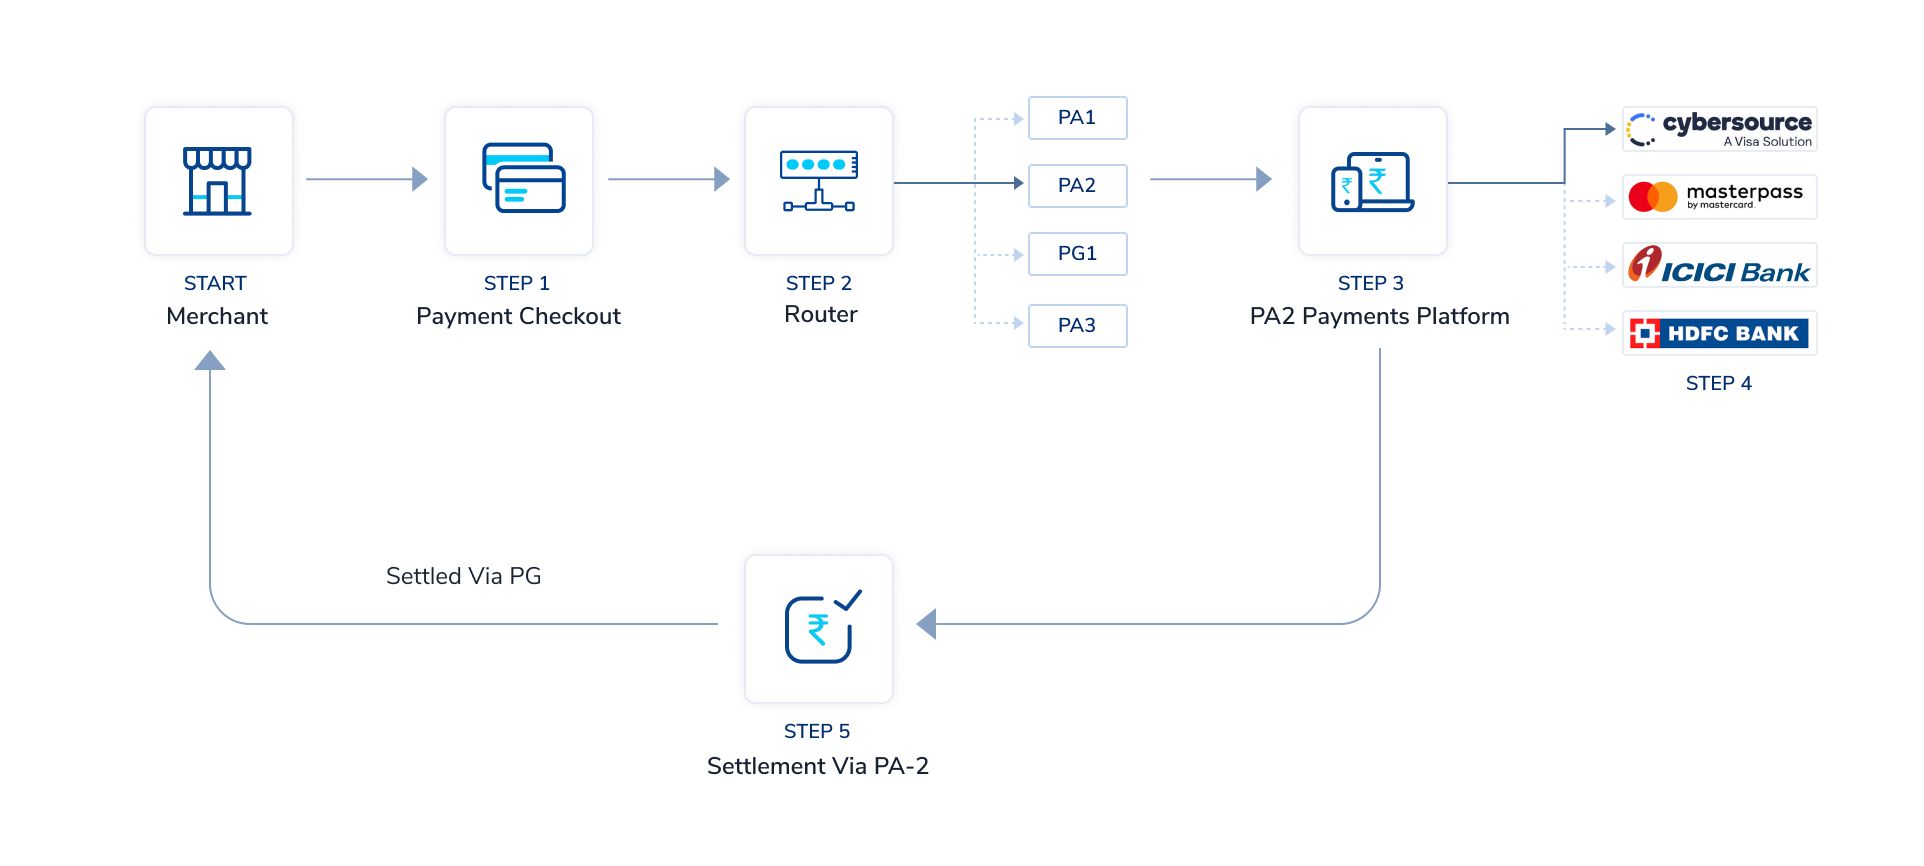
- The customer lands on checkout and selects the payment instrument of choice. Depending on the experience you are willing to offer, the cashier page can be owned by the merchant within his APP/website or can be owned by Paytm.
- The Super Router has multiple payment aggregators that are required to be configured by the merchant to process this transaction. Amongst the PAs available for that payment method, the choice is determined by two ways:
- Maximize for payment success rate - Under this objective, the router sends the transaction to the gateway which is most likely to make the transaction successful. Both historic and real-time performance of payment aggregators on similar type of transactions is taken into consideration.
- Merchant Preference - Merchant can define routing preferences between gateways for different types of transactions.
Example: For HDFC card merchant wants to route 80% of transactions to PA1 and the rest to PA2. In case the merchant has set such routing preference, the preference is given to both PA1 and PA2 provided they are performing above a threshold that can be controlled by the merchant.
- The payment aggregator receives the payment request with the merchant's order ID and credentials configured by the merchant. It registers the same and initiates the processing of a transaction. PA also needs to select between different payment gateways available to process the transaction.
- The payment gateway in turn connects with networks and banks to facilitate the complete processing of transactions.
- Once the transaction is processed, the settlement is done by PA2 directly to the merchant based on the agreed settlement frequency and MDR aligned between the aggregator and the merchant. Super Router does not get involved in the process of settling money for the merchant.
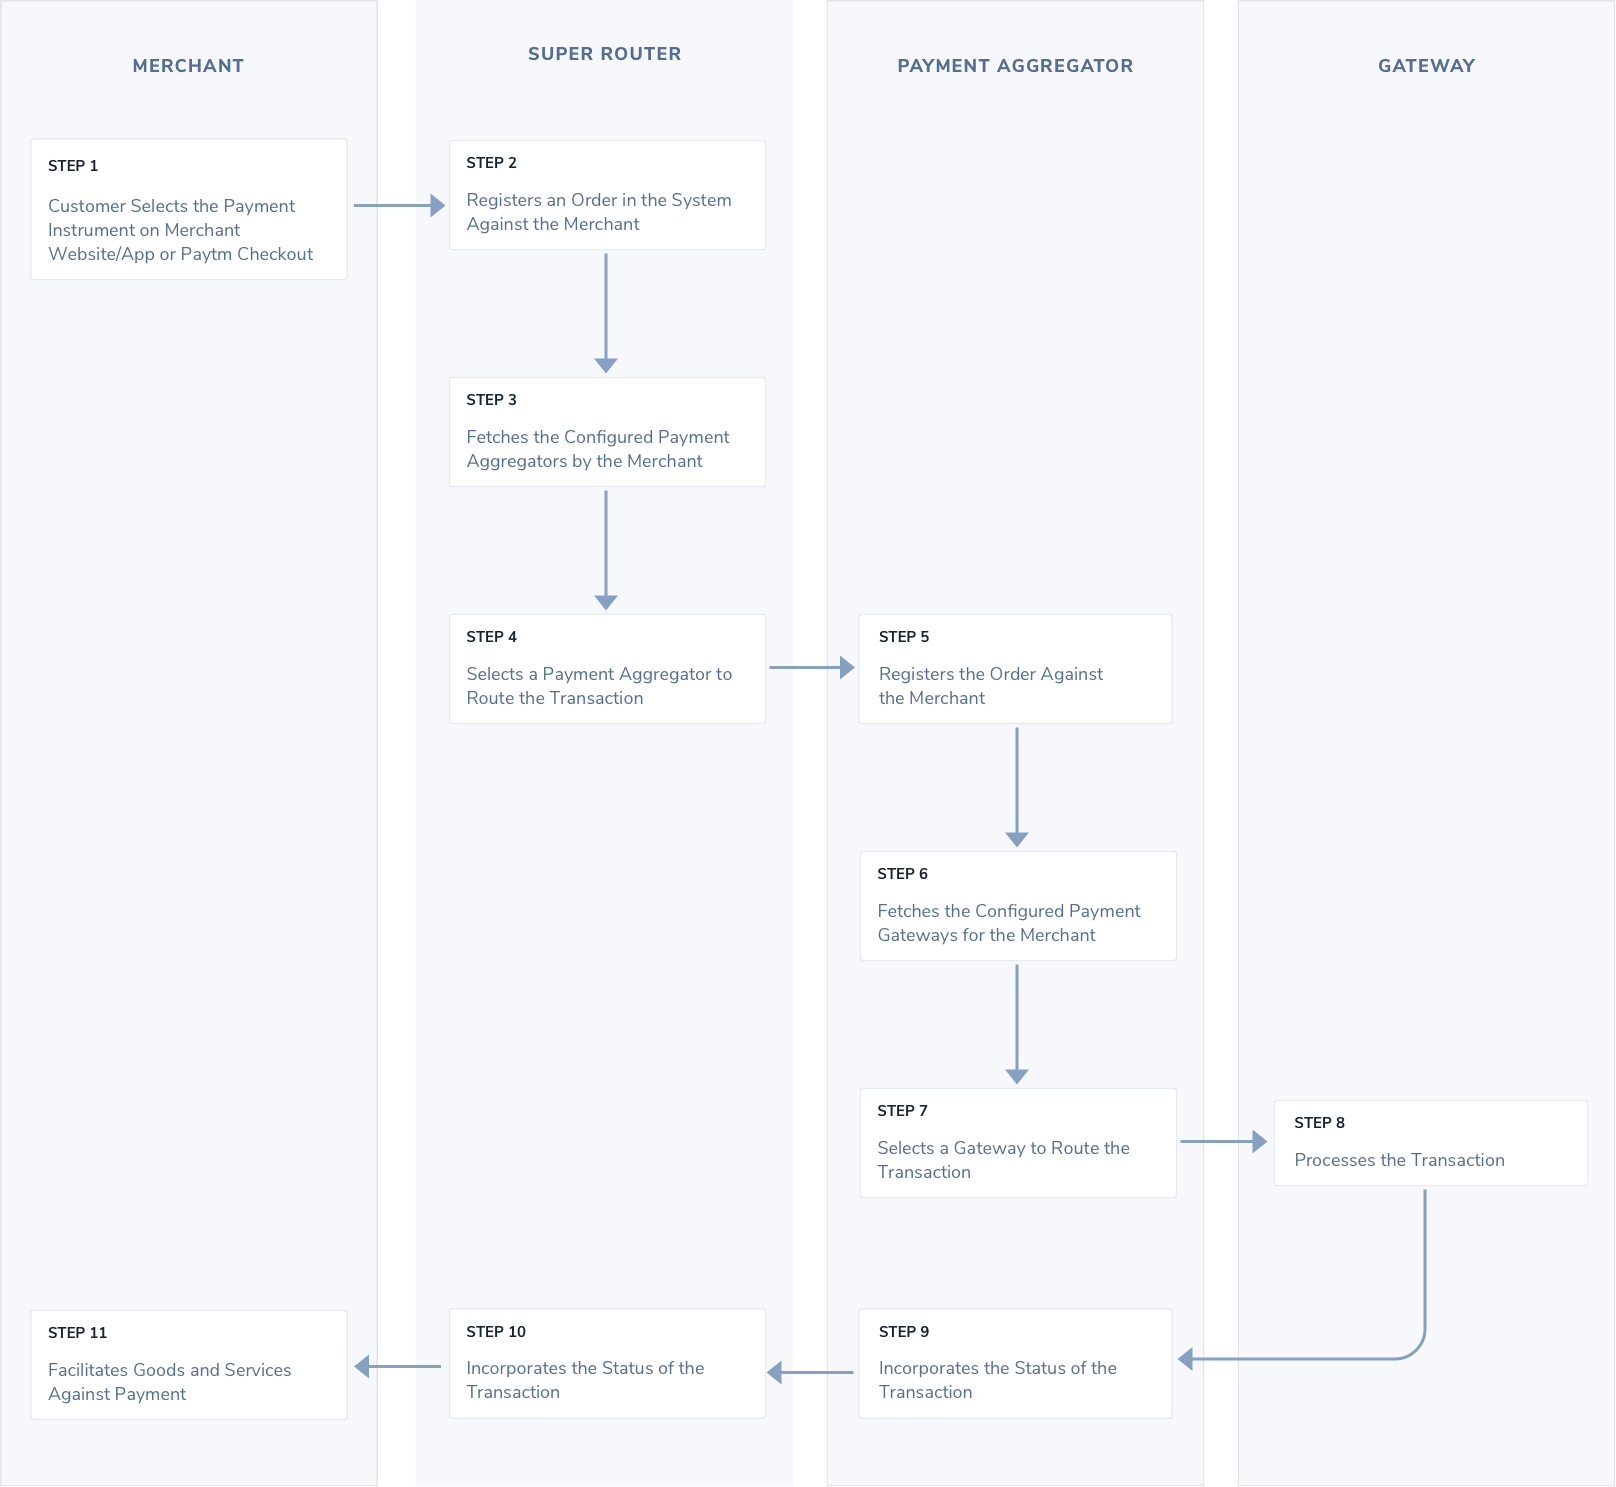
Transaction Journey
A simplistic view of the transaction journey is provided below:
Payment Aggregators available
As of now, the following PAs are available with Paytm Super Router. Merchant just needs to connect with one or multiple payment aggregators. Most of these payment aggregators have a DIY onboarding platform wherein you are required to provide business details.
Based on their onboarding process, you will get the production credentials. These credentials can be configured on Paytm's merchant panel along with the payment methods supported by these gateways. Once configured and active, your transactions will be routed to the configured gateways:
| Aggregator |
Payment Source |
| Paytm |
Credit Card, Debit Card, Net Banking, UPI Collect, Paytm Wallet |
| CC Avenue |
Credit Card, Debit Card, Net Banking |
| Billdesk |
Credit Card, Debit Card, Net Banking |
| Payu |
Credit Card, Debit Card
All Card Schemes |
| Cybersource - HDFC |
Credit Card, Debit Card
All Card Schemes |
| Cybersource - Axis |
Credit Card, Debit Card
All Card Schemes |
| MPGS - HDFC |
Credit Card, Debit Card
All Card Schemes |
| MPGS - Axis |
Credit Card, Debit Card
All Card Schemes
|
Accepting payments via Super router
The merchant needs to follow three simple steps to provision the transaction Journey:
Step 1: Integrate with a Paytm Checkout
Depending on the merchant's platform there are various methods of integration that are provided below. Merchant can go through the individual integration document of the individual checkout flow. Note that as of now the payment sources are limited to the one provided in the above section.
|
Checkout Flow
|
Status
|
| Custom Checkout |
Available |
| JS Checkout |
Not available under Super Router solution. It will be made available soon |
| All in One |
Not available under Super Router solution. It will be made available soon |
If you are an existing PG merchant on Paytm accepting payments, then there are small changes that need to be made to the current integration. The changes wrt each checkout product are provided below:
Custom Checkout
In order to accommodate the changes. These changes are also present in the respective API documentation also. Apart from these, all APIs will behave.
|
APIs
|
Request Change
|
Response Change |
| Initiate Transaction API |
- Merchant needs to use Super Router MID
- Merchant needs to use super router key for generating checksum
- requestType for this AOA product is UNI_PAY
|
No Change |
| Transaction Status API |
- Merchant needs to use Super Router MID
- Merchant needs to use super router key for generating checksum
|
- gatewayName - Name of the gateway used to process the transaction
- gatewayInfo - Response received from the gateways while processing the transaction
|
| Payment Status Webhook |
NA |
Same as above |
| Refund API |
- Merchant needs to use Super Router MID
- Merchant needs to use super router key for generating checksum
|
No Change |
| Refund Status API |
- Merchant needs to use Super Router MID
- Merchant needs to use super router key for generating checksum
|
gatewayInfo |
| Refund Accept Webhook |
NA |
Not triggered wrt Super Router
This webhook is triggered in the event of a successful deduction of the refund amount from the merchant's unsettled account. This event does not happen for a transaction in super router as money movement for transaction and refund is the ownership of the PA.
Note that if you have this webhook configured on Paytm PG, then it will be triggered from Paytm PG that is sending in the capacity of a PA |
| Refund Success Webhook |
NA |
The webhook is triggered when a refund request reaches a terminal state i.e. PA either accepts or fails the refund
gatewayInfo |
JS Checkout
Not supported on Super Router
All In one
Not supported on Super Router
Step 2: Aggregator configuration
The merchant would have to configure the PAs that it intends the route the transaction to. Without configuration of same, the Super Router solution will not work. By default Paytm payment aggregator is configured behind the Super router. Merchant can control the transaction to be sent to the Paytm payment aggregator.
You can see below the steps to configure PAs:
- Out of the aggregators available in the list above, merchants need to go and onboard themselves as a merchant. This only requires the submission of details about your business/website. Once approved, production credentials are provided. These are generally provided from the aggregator's dashboard panel (as in the case of Paytm also).
- On the Paytm merchant dashboard, the merchant will have to log in and select the Super Router MID from the top left corner. This is available with a click of a user icon where one will see Super Router all numerical MID. If this is not available, then the merchant should connect with the support team.
- In Super Router, under the Manage Gateways section, you will see multiple gateways.
- Click the Activate Now button against the gateway that you have onboarded your business onto.
- In the side window, provide the credentials received from the payment aggregator.
- Configure the payment methods that have been allowed on that payment aggregator and click Activate.
Step 3: Routing Preference Configuration
This step is required if a merchant has a predefined routing preference. In case there are no routing preferences configured, the routing engine of the Super router selects the gateway to maximize the chances of success of the transaction. Below are the steps to be followed to configure the routing preference:
- Merchant needs to gateway routing under the Super Router tab. Here merchants select the payment source corresponding to which the rule needs to be configured.
- Cards - Both credit and debit cards are bundled into one as there will be rules that will be overarching in nature. Merchant can also set rules with respect to credit and debit card separately. Below mentioned are different levels at which routing preferences can be set:
- Credit or Debit Card
- Card Scheme - Visa, Mastercard, Rupay, American express etc.
- Issuing Bank - Top 15+ banks
- Card Type - International, Corporate, Prepaid
- Card BINs
- UPI - Below mentioned are different levels:
- Entire Payment source UPI can be routed to preferred payment aggregator/s
- UPI Flows like Intent and collect. Note that UPI Push will only be routed via Paytm. This is because it requires a deep integration with Paytm payment bank which is available with Paytm gateway only
- Net Banking - Below mentioned are different levels:
- Entire Payment source Netbanking can be routed to preferred payment aggregator/s
- Top 50 Issuing Bank - Separate rule can be configured for HDFC vs. ICICI banks
- Wallet - As of now, we only support Paytm wallet. Paytm wallet will be routed via Paytm Gateway only. Hence it is not provided as a routing option:
- Under this tab, the merchant can add or modify an existing rule. To add a rule, the merchant will click on Add routing preference.
- Here merchant needs to do the following three steps:
- Selection of level - The level at which the routing preference needs to be configured. If the merchant wants to set routing rules for HDFC Visa cards, then HDFC Visa is the level. Possible levels are provided above.
- Configuring gateway distribution - The desired split of transactions amongst multiple gateways.
- Setting up Baseline - Baseline protects against the scenario where one/some preferred gateways perform below par. E.g merchants intend to route HDFC Visa cards to PA1 and PA2 in the ratio of 20% and 80% respectively. At some point, it might happen that PA2 starts performing badly yielding a low SR of 35%. Hence it would be better to route the transaction to PA1 or the other remaining gateways configured to process card transactions on this merchant. There are two types of baseline that merchant can set:
- Static Baseline - This is a static % below which the preference will be dissolved. Hence in the above example, the merchant can set a static baseline of 60% to ensure that PA2 does get any preference.
- Dynamic Baseline - This is a dynamic % that sets baseline with reference to the best-performing gateway on that type of transaction configured for the merchant. Let us assume in the above scenario, the best performing gateway PA3 is having a success rate of 80%. With a 10% dynamic baseline, the cutoff that comes out is 72%. Only the preferred gateways performing above 72% will be eligible to get the transaction.
Note: In case no value is baseline is set, we set a default value of 10%.
- In case there are conflicting rules, the merchant can also set priority against the rules by moving them up and down. Examples of such rule can be for level Credit Cards and HDFC cards as HDFC cards are a subset of credit cards.
Refunds
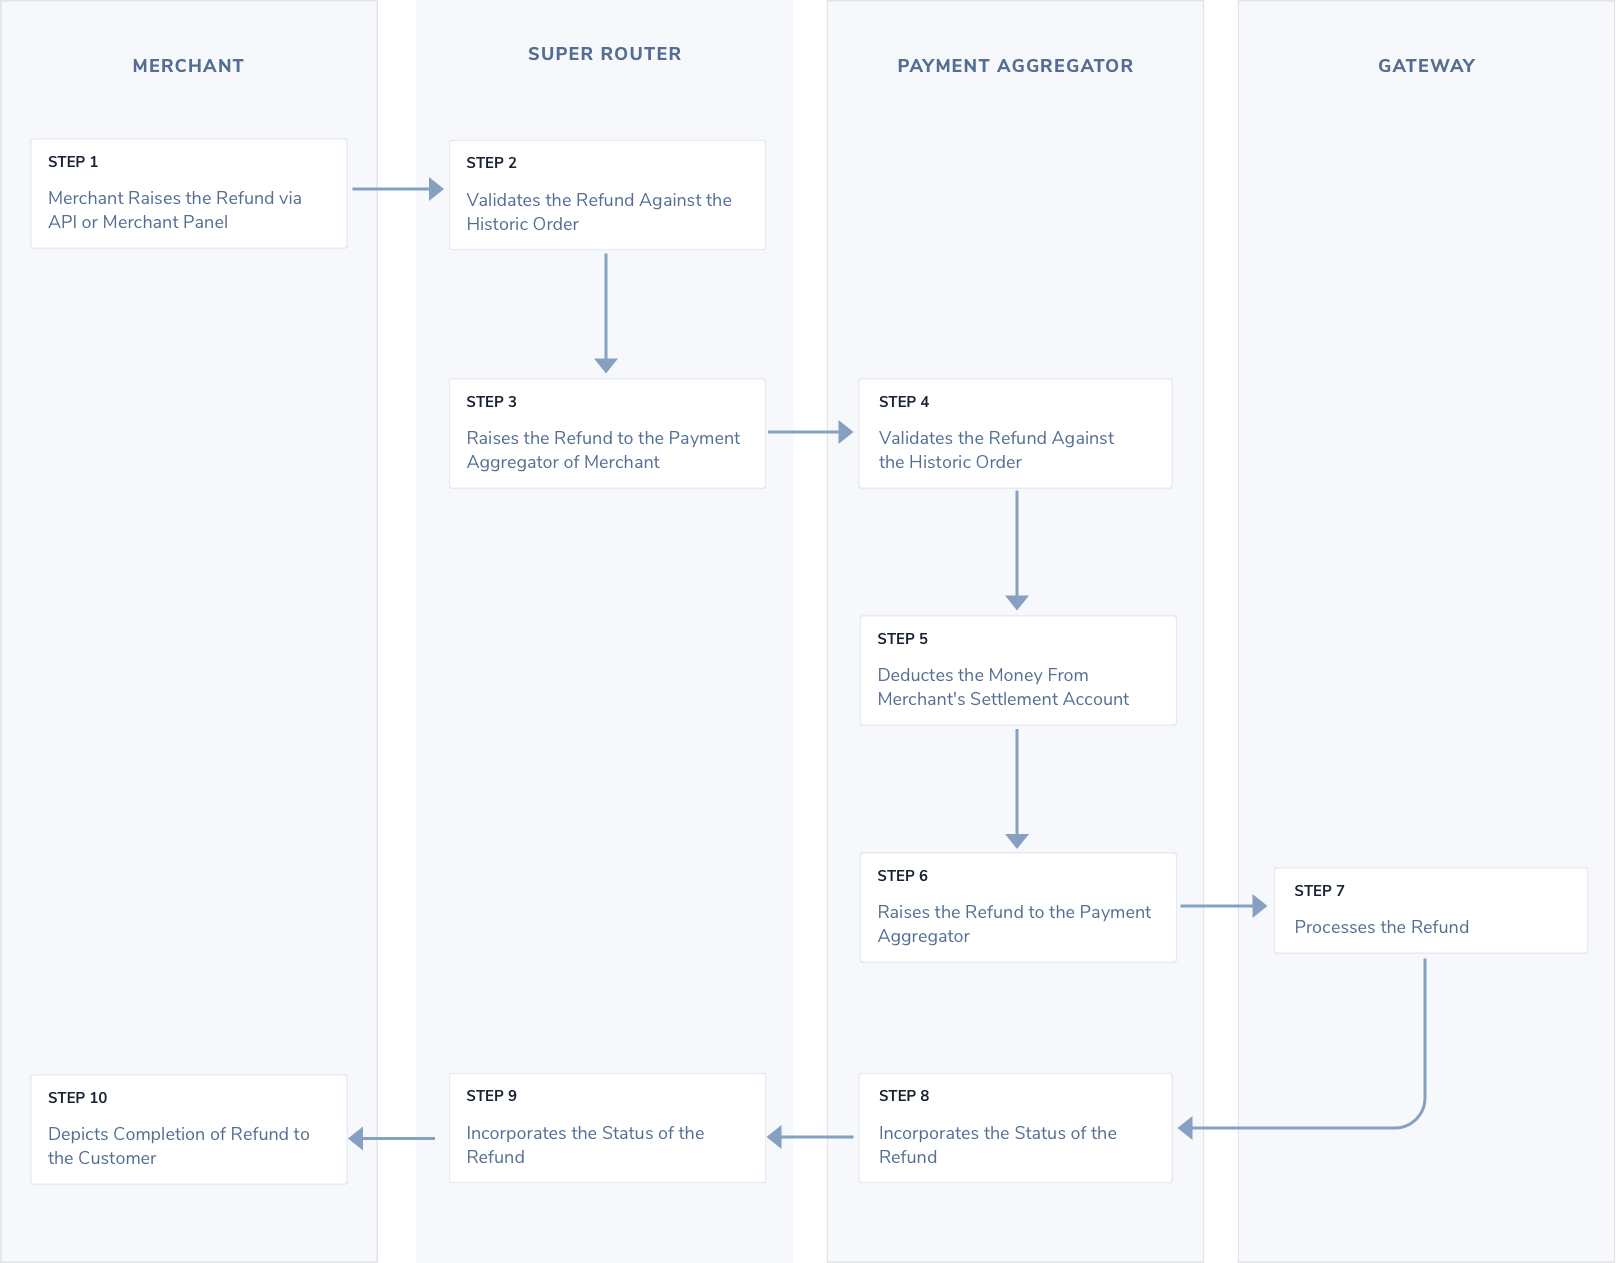
Refund is a straightforward process wherein a refund can be raised via our APIs or merchant panel. A simplistic refund process is provided below:
Refund via API
-
Initiate refund from your backend using our Refund API.
-
Paytm validates the refund against the original order. These are basic validations like a cumulative refund on this order < order value, the order is not more than a year old etc.
-
Sync confirmation after validation of refund is provided in response to the Refund API request.
-
Once the refund is validated at Paytm's end, Paytm initiates the refund to the payment gateway. Apart from net banking refunds, this is instant in nature. Most of the net banking refunds are file-based and hence are sent to the bank on the next working day.
-
Once the bank accepts or fails the refund, Paytm sends a Success Refund Webhook to the merchant. This webhook contains all the relevant details passed by the acquirer.
- In case the refund is in the pending state, we try to fetch the refund status from the payment gateway for 10 days after it initiation of refund.
-
At any point of time, the detailed information of refund can be fetched using the Refund Status API.
Refund via Merchant Dashboard
- In the transaction tab of the Paytm merchant dashboard, the merchant can the transaction needs to refunded. Detail view of the same will be rendered.
- There is a refund button on top of the detail view which can be used to raise the refund against the transaction. All details will be available in the Refund tab.
Settlement
Paytm super router is not involved in the settlement process. The payment aggregator directly settles with the merchant. Based on the settlement frequency and agreed MDR, the payment aggregator settles the collected amount into the merchant's linked bank account (linking is done on the merchant's platform).
Additionally, there is a fee levied to the merchants for availing the services of this product. The same is provided in the agreement signed with Paytm. This fee is shared on a monthly basis to the merchant in form of an invoice which is payable via wire transfer or cheque/DD payment.
Post integration steps
Post completion of integration in your staging environment, it is mandatory to test the Paytm payment sources integration on your website/app before moving into the live environment with production account details (received from Paytm team).
- You can view the staging transaction details in the “Test Data” mode on your dashboard.
- You must ensure to re-verify the transaction response with Transaction Status API via server to server call for payment flow and not as a one-time activity.
Post successful testing in your staging environment, move your code to the live environment with production account details. These credentials will be available after you activate your business account with Paytm on the Merchant Dashboard.
For any issues with the integration, refer to Get in touch.

